Tuesday, June 23, 2009
Tuesday, June 16, 2009
Monday, June 15, 2009
Good feature..fast way to plumb up interface.....and ipmp quick test
root@pw450 # vi /etc/hosts
"/etc/hosts" [Read only] 20 lines, 452 characters
#
# Internet host table
#
::1 localhost
127.0.0.1 localhost
192.168.100.119 pw450 pw450. loghost
192.168.100.136 pw850
172.16.32.78 pw450fjgi1
172.16.32.79 pw450fjgi2
172.16.32.89 pw450fjgivirtual
2. Run the following commands, both interfaces are up.
root@pw450 # echo pw450fjgi1 > /etc/hostname.fjgi1
root@pw450 # echo pw450fjgi2 > /etc/hostname.fjgi2
root@pw450 # svcadm restart physical
root@pw450 # ifconfig -a
lo0: flags=2001000849
inet 127.0.0.1 netmask ff000000
hme0: flags=1000843
inet 192.168.100.119 netmask ffffff00 broadcast 192.168.100.255
ether 0:e0:0:c4:b8:81
fjgi1: flags=1000843
inet 172.16.32.78 netmask ffff0000 broadcast 172.16.255.255
ether 0:b:5d:d7:d9:bb
fjgi2: flags=1000803
inet 172.16.32.79 netmask ffff0000 broadcast 172.16.255.255
ether 0:e0:0:a6:f1:e4
OK. Now further to configure IPMP.
Edit fjgi1 and fjgi2. The logical ip will run on fjgi1 first.
root@pw450 # cat /etc/hostname.fjgi1
pw450fjgi1 netmask + broadcast + group ipmp7889 deprecated -failover up addif pw450fjgivirtual netmask + broadcast + failover up
root@pw450 # cat /etc/hostname.fjgi2
pw450fjgi2 netmask + broadcast + group ipmp7889 deprecated -failover standby up
root@pw450 #
Restart the interface:
root@pw450 # svcadm restart physical
root@pw450 # ifconfig -a
lo0: flags=2001000849
inet 127.0.0.1 netmask ff000000
hme0: flags=1000843
inet 192.168.100.119 netmask ffffff00 broadcast 192.168.100.255
ether 0:e0:0:c4:b8:81
fjgi1: flags=9040843
inet 172.16.32.78 netmask ffff0000 broadcast 172.16.255.255
groupname ipmp7889
ether 0:b:5d:d7:d9:bb
fjgi1:1: flags=1000843
inet 172.16.32.89 netmask ffff0000 broadcast 172.16.255.255
fjgi2: flags=69040843
inet 172.16.32.79 netmask ffff0000 broadcast 172.16.255.255
groupname ipmp7889
ether 0:e0:0:a6:f1:e4
**This is really good, no need to plumb and unplumb using ifconfig.
Check if mpathd running...well it is not.
root@pw450 # pgrep -lf mpathd
root@pw450 #
Start it.
root@pw450 # /usr/lib/inet/in.mpathd
root@pw450 # pgrep -lf mpathd
21055 /usr/lib/inet/in.mpathd
root@pw450 #
Now the pull cable test. fjgi1 cable is unplugged. This is fast.
root@pw450 #tail -f /var/adm/messages
Jun 16 14:59:26 pw450 fjgi: [ID 391805 kern.notice] fjgi1: network connection down
Jun 16 14:59:26 pw450 in.mpathd[21055]: [ID 215189 daemon.error] The link has gone down on fjgi1
Jun 16 14:59:26 pw450 in.mpathd[21055]: [ID 594170 daemon.error] NIC failure detected on fjgi1 of group ipmp7889
Jun 16 14:59:26 pw450 in.mpathd[21055]: [ID 832587 daemon.error] Successfully failed over from NIC fjgi1 to NIC fjgi2
Check ifconfig output. IT failed over nicely.
root@pw450 # ifconfig -a
lo0: flags=2001000849
inet 127.0.0.1 netmask ff000000
hme0: flags=1000843
inet 192.168.100.119 netmask ffffff00 broadcast 192.168.100.255
ether 0:e0:0:c4:b8:81
fjgi1: flags=19040803
inet 172.16.32.78 netmask ffff0000 broadcast 172.16.255.255
groupname ipmp7889
ether 0:b:5d:d7:d9:bb
fjgi2: flags=29040843
inet 172.16.32.79 netmask ffff0000 broadcast 172.16.255.255
groupname ipmp7889
ether 0:e0:0:a6:f1:e4
fjgi2:1: flags=21000843
inet 172.16.32.89 netmask ffff0000 broadcast 172.16.255.255
How about my ping test?
64 bytes from 172.16.32.89: icmp_seq=29. time=0.346 ms
64 bytes from 172.16.32.89: icmp_seq=30. time=0.352 ms
64 bytes from 172.16.32.89: icmp_seq=31. time=0.380 ms
64 bytes from 172.16.32.89: icmp_seq=32. time=1.45 ms
64 bytes from 172.16.32.89: icmp_seq=33. time=0.366 ms
64 bytes from 172.16.32.89: icmp_seq=34. time=0.344 ms
64 bytes from 172.16.32.89: icmp_seq=35. time=0.263 ms
64 bytes from 172.16.32.89: icmp_seq=36. time=0.387 ms
OK! That's no bad!
Now plug the cable back.
Jun 16 14:59:26 pw450 in.mpathd[21055]: [ID 832587 daemon.error] Successfully failed over from NIC fjgi1 to NIC fjgi2
Jun 16 15:03:59 pw450 fjgi: [ID 111774 kern.notice] fjgi1: network connection up
Jun 16 15:03:59 pw450 fjgi: [ID 513339 kern.notice] autonegotiation: on
Jun 16 15:03:59 pw450 fjgi: [ID 268518 kern.notice] speed: 100
Jun 16 15:03:59 pw450 fjgi: [ID 537610 kern.notice] flowctrl: none
Jun 16 15:03:59 pw450 fjgi: [ID 511210 kern.notice] duplex: full
Jun 16 15:03:59 pw450 in.mpathd[21055]: [ID 820239 daemon.error] The link has come up on fjgi1
Jun 16 15:04:14 pw450 in.mpathd[21055]: [ID 299542 daemon.error] NIC repair detected on fjgi1 of group ipmp7889
Jun 16 15:04:14 pw450 in.mpathd[21055]: [ID 620804 daemon.error] Successfully failed back to NIC fjgi1
And the ifconfig output. It's back to normal.
root@pw450 # ifconfig -a
lo0: flags=2001000849
inet 127.0.0.1 netmask ff000000
hme0: flags=1000843
inet 192.168.100.119 netmask ffffff00 broadcast 192.168.100.255
ether 0:e0:0:c4:b8:81
fjgi1: flags=9040843
inet 172.16.32.78 netmask ffff0000 broadcast 172.16.255.255
groupname ipmp7889
ether 0:b:5d:d7:d9:bb
fjgi1:1: flags=1000843
inet 172.16.32.89 netmask ffff0000 broadcast 172.16.255.255
fjgi2: flags=69040843
inet 172.16.32.79 netmask ffff0000 broadcast 172.16.255.255
groupname ipmp7889
ether 0:e0:0:a6:f1:e4
This quick test and memory refresh of my ipmp is good!
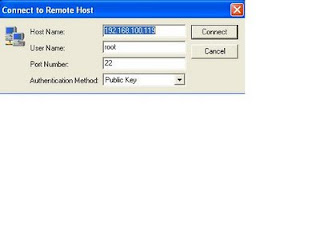
just a quick note on secure shell client
Client: WinXP using Secure Shell ssh client.
Server: Solaris 10 running Openssh protocol 2.
This is for myself so that i remember how to do it next time..
1. my laptop has got secure shell ssh client installed.

2. On my solaris 10.
root@pw450 # pgrep -lf ssh
18746 /usr/lib/ssh/sshd
632 /usr/lib/ssh/sshd
18749 /usr/lib/ssh/sshd
root@pw450 # svcs ssh
STATE STIME FMRI
online 10:33:00 svc:/network/ssh:default
3. Generate a private key on my ssh client and uploaded to server pw450.

4. Check on Solaris server pw450. The public key has been uploaded to /.ssh2.
root@pw450 # cd /.ssh2
root@pw450 # pwd
/.ssh2
root@pw450 # ls
authorization wh7889.pub
root@pw450 #
#ssh-keygen -i -f /.ssh2/wh7889.pub > /.ssh/wh7889ossh.pub
6.
root@pw450 # pwd
/.ssh
root@pw450 # ls
authorized_keys known_hosts wh7889ossh.pub
root@pw450 # ls -l wh7889ossh.pub
-rw-r--r-- 1 root root 1613 Jun 16 12:06 wh7889ossh.pub
root@pw450 #
root@pw450 # cat wh7889ossh.pub > authorized_keys
root@pw450 # more authorized_keys
ssh-dss AAAAB3NzaC1kc3MAAAGBAJ5uyGdcXoAaHKZBhOYCt8GlHyV9Q8bvH2wWQ+/Anh87CtiRVTHk
S8XkHHyX5W07dDQjYUe9eGNFkCeKLvliFnsKnyTienLGoKt/9Dm1KruQU4IVrsUiAzMVnI2qCvO0kAIH
DJe0f2dlOuOU0xhc+OCxhAL6vrnKNeAeHZe9sKx1hjTIhMrANO0NJFapy+575T+veFERp5r3WFCPNIqU
CxXNjLSMP6qaOw0IXSMqnUNaWp/eiYzRRVwpjPovJMTyDBq5PXdmYYr3m0u2U6hQqs/Bq5BPSgW/swiD
n+8zvyTuQ1I+1WsYdjXjkT6dHt8T31x6FUf37kTt52Hded0dHGOr0C7+IDOCQuxpBXoyzugi9GNBeKBR
R7fkO5QSt3aHt7kB/J/cv2dQUeewiSATI+7rH4G2j0OEjezPKmi5dbBZYEz4bScgwidflkvKEQaXmjoj
1ihT4L8POEN/1i/jeGPEIafAo3XOQW3+Y29bq6sXGhHRLKIDX/30uRsG7n/NhwAAABUAxcHf6DCO8UqE
edcQemYJAWR5InMAAAGAU6FmPa4NFE1madfIyN1bl3VlP0Kl4bu73SwFFVhI6YkapItr9iRa9MayH0oJ
5u6HyY5J0WVVOHTEq8C7TSrTPyy7S9ACWED/bJpruw1tJIHQSpP53oRea1rzrHKCN5dmXT+/3pivV15R
SX5eomKGun6+XZCy2i8JqQoc4KlZlVmWJ+Xsil+vJvTbBz1WeVBaJpxsh+ZWIEr4ljYS6Ra9ZPlQZYlx
8dVxnMhx2tf2uwazQmkokBuQNiSgnrQbu7boekxUfLSuncqQs4PORm8chWEjaFpUPeoPbsOYvh9yahks
auo36JMFZb2w6h1KKWPsySR5nUkQ0DeLvid1uPFQhXeiUOG+1WwW3VK1nwezVZzZL9VYtrOBZVCbBSgw
wMLO2CFkjXLIVX3Gog51Y3KmpSWa/u4Cplb2xHrSlErn+bjk6wUhDhyCbVjU+gPhSlUb54BbrExmj9AE
KKsSgTayb9kViENLvEVcShFrw6cXKD5G6ec/j497Az80Crck2NRNAAABgG/l5ITDh5oLTGjcPPj6+vaC
S+uYOErcD83QY9PYQveHiaePyFYVbAS2MYoJ8Rjbem2RBxTKDMHr4ZK903NAy5d5XOLivDBx+vFwJiDp
FzC0UEoyN6tervPMqMC978+4wvUYSggZJ302MPYW4Qp9kAHCoSVPTlFnoRbpSOh32Prd3urGZHxHF9+1
rgdlU1mGek91Qa6XZfnVu2PfGixg6SmGkBwOb/9pAbrCPmHnzklQJ5X7uQSamVTkscsQdo//o8Z4FjOb
6eHZu2lnSPde0FtP0WPt4R0emQ99LSuFKrBKDcXQ1g3TKFG5kg8XJkUqpSDH7dcWx9pXQq54sJX6fMWh
skYvsJuuj752TGtbpz294AnPYlAGFNyRr9yvccaSXTzNFuTYY5O+zwM4+FqNb0i3FeSgVtl1L75hRUVF
bQagweAwsk9zENMMvO5eziuEpX+B+qbZytnzLx3VccgVcSXh624EAZWbYhSwSpF7wMhTLlMl+Qe/DgMF
8. Login using public key and u will be prompted to enter passphrase. Yes!!


